
Ouuwee! It was another busy day today for Dynamo. I know I say that almost everyday but it’s true! There’s so many rocks hitting windshields at this time of year in Edmonton. It just never ends! Good for my business though. 😉
Anyhow, my day started off on the south side of Edmonton. I stayed in the south side for a few appointments before making my way to the north side for a few more windshield repairs. I finished my day on the south side before finally heading home.
There were a couple of returning customers today, which is always nice. One returning customer got smacked by a rock yesterday. It wasn’t the worst rock chip I’ve seen, but it definitely did some damage. Thankfully, she booked an appointment online right away for today.
When I got to her house, I spotted the rock chip right away. It was a nasty combination chip on the bottom driver’s side of the windshield. It was about the size of a nickel. I let the customer know that it was going to leave an ugly scar but it’s good to repair it now before it gets any worse. She agreed!
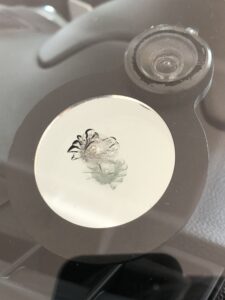
I got started with my usual windshield repair process. I flexed the legs and the impact point of the rock chip. I could tell that it was fresh and there was some play with the glass while flexing. I drilled into the impact point to clean up the crushed glass. Next, I grabbed my windshield repair bridge and placed it over top of the break. I dropped a few drops of resin into the injector and placed the plunger into a pressure cycle.
The resin flowed into the rock chip right away. I could tell that this combination chip was going to take some extra resin and some extra flexing to ensure it was filled correctly. I left the machine in a pressure cycle for at least 5 minutes. I then pulled the plunger up into a vacuum cycle to pull out all the air that was trapped inside the windshield. I left the machine in a vacuum cycle for about 5 minutes as well. I then added a few more drops of resin and placed the plunger back into a pressure cycle.
I flexed lightly around the chip with my pen and flexed through the injector. I alternated between pressure and vacuum cycles a few times as well. Taking your time when it comes to bigger chips like this is always key.
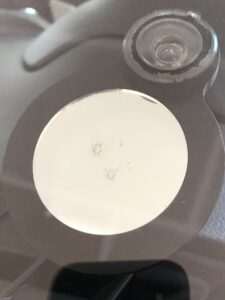
After about 40 minutes, I could tell that the rock chip was all filled in with resin. I grabbed my thicker pit resin, a plastic tab and my UV lamp. I put some pit resin on the break and placed the plastic tab over top. I turned on the UV lamp and let it cure the resins for about 2 minutes.
Once all the resin was cured, I scraped off the excess resin from the rock chip. I polished up the impact point with some pit polish and a wine cork. I then cleaned up the rest of the windshield and put away all my tools. I let the customer know that she was all good to go. She seemed happy to have been able to book an appointment for the next day. I assured her that know she will not need to worry about the windshield chip spreading out now.
We exchanged goodbyes, I left a couple ‘fix me’ stickers in her vehicle and I made my way to my next appointment. Only 4 more appointments to go, lol. Time for some tunes and a quick snack. Take care!
If you live in Edmonton and are in need of a windshield chip repair for your vehicle, please do not hesitate to contact my mobile windshield repair company.
If you missed yesterday’s blog post, you can catch up here.
All the best!
– Zach Rodgers
Owner @ Dynamo Windshield Repair