
It’s finally hump day! Still a little chilly outside today in Edmonton. But it looks like spring is slowly on its way!
Today was a fairly steady day for Dynamo Windshield Repair. I started my day off down in Beaumont and then came back up to the Forest Heights area. Then I finished my day off on the west side of Edmonton.
One customer today had a rock chip that was previously repaired (by another company) that had spread into a small crack. After a thorough inspection, I could tell where the chip was already filled and where the crack had split out from. It looked like the technician didn’t add enough resin into the chip or didn’t use the proper windshield repair procedure to remove all the air trapped in the glass.
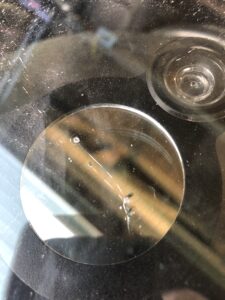
The crack had spread out about 2 inches from the impact point. I told the customer that he didn’t really have many options. The only thing I could do is drill a hole at the end of the crack and inject resin inside to try and prevent it from spreading out any further.
Unfortunately, the chip was on an expensive heated windshield on a Jaguar. The customer understood the risks involved with the crack stop but wanted me to give it a shot as his windshield was fairly expensive to replace.
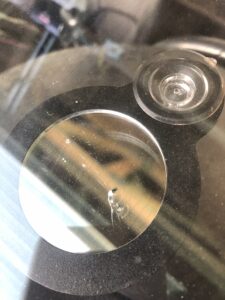
So, I drilled a small hole at the end of the crack with my Dremel. I made sure that the hole was deep enough for the resin to be injected into the crack. Next, I placed my windshield repair bridge over top of the small hole. I dropped a few drops of resin into the injector. I then put the plunger into a pressure cycle.
I left the injector in a pressure cycle for the remainder of the windshield repair. With a crack stop, pulling the injector into a vacuum cycle might disrupt the flow of the resin. Therefore, it’s usually best to leave it in a pressure cycle while flexing through the injector. I also applied resin on the outside of the crack with a Q-Tip soaked in resin. This helps fill in the crack from the surface of the glass.
The customer and I chatted while I worked on the windshield crack. After about 20-30 minutes of flexing and coating the crack with resin, I told the customer that this was probably the best it would get. I explained to the customer that I can’t really guarantee that it will hold up, especially because the other technician did a poor job repairing the rock chip in the first place. He said he understood and just wanted me to try anything before it got any worse.
After the crack was done filling, I grabbed a long piece of curing tape and placed it over top of the break and the crack. I placed the UV lamp over top for about 4 minutes. Once everything was done curing, I scraped off the excess resin with my razor blade. I cleaned up the pit and washed the area of the windshield I was working on.
I gave the customer a couple ‘fix me’ stickers and a business card. Before exchanging goodbyes, I told the customer to let me know if the crack starts to expand any further. Next, I got into my car and made my way to my next appointment.
If you live in Edmonton and are in need of a windshield chip repair for your vehicle, please do not hesitate to contact my mobile windshield repair company.
If you missed yesterday’s blog post, you can catch up here.
All the best!
– Zach Rodgers
Owner @ Dynamo Windshield Repair